読了: 約 7 分
今制作に携わっているアプリケーションでページ毎、パーツ毎(ファーストビューであるか否か、アイコン等)でフォルダを作って画像を管理しています。
ホーム、投稿ページ、マイページ、タイムライン等。その中でもGoogleが最近1000ms以内で表示しろというものを出していて、
それじゃないと評価しないぞという事でスピードに本当にシビアになってきていますね。
Google公式サイトから
Mobile Analysis in PageSpeed Insights
Googleの方が書いた最近のspeedに対しての記事
Intro – Webを速くするためにGoogleがやっていること Make the Web Faster 00 –
スタートアップのようにアプリを出してすぐの時や2,3年は改善を早いサイクルで回すために、
CSS Spriteや1つ1つの画像の管理が難しくなってきます。
1つ1つにしてDATA URI化してしまうと今度はCSSのサイズが膨大になってしまう。
そんな中で運用の効率化をどう図ればいいのかという事で、今回は画質調整の自動化に焦点を当てて
体験としての学びを書いておきます。
概要
何はともあれGruntを入れる

grunt ~で色々実行してくれるgruntさん
インストール周りは他の方の記事があるのでそちらを参考にしていただければと思います。
フォルダ構成とレベル
フォルダ構成は例としては下記の様なものを想定しています。
圧縮率はhighとlowに設定8bitsの場合はhigh, 4bitsの場合lowのように設定する事にします。
assets/images/pageA/~
             /pageB/~
             /fv(firstview)/~
                           /h(high)
                           /l(low)
             other.png
gruntはgrunt-contrib-imageminを使用
https://github.com/gruntjs/grunt-contrib-imagemin
インストールはこれでおけ。
npm install grunt-contrib-imagemin --save-dev
基本的な設定は下記の様な感じです。
dynamicの方はディレクトリを設定して一気に統一された画像の最適化を出来ます。
上のstaticは個別に設定したい特殊なものを設定できます。
grunt.initConfig({
  imagemin: {                          // Task
    static: {                          // Target
      options: {                       // Target options
        optimizationLevel: 3
      },
      files: {                         // Dictionary of files
        'dist/img.png': 'src/img.png', // 'destination': 'source'
        'dist/img.jpg': 'src/img.jpg',
        'dist/img.gif': 'src/img.gif'
      }
    },
    dynamic: {                         // Another target
      files: [{
        expand: true,                  // Enable dynamic expansion
        cwd: 'src/',                   // Src matches are relative to this path
        src: ['**/*.{png,jpg,gif}']    // Actual patterns to match
        dest: 'dist/'                  // Destination path prefix
      }]
    }
  }
});

grunt.registerTask('default', ['imagemin']);
filesは右のpathの画像が左の名前になって、最適化されます。
フォルダ分けしたい場合はこのようにします。
files: {                         // Dictionary of files
        'dist/img.png': 'src/img.png', // 'destination': 'source'
        'dist/img.jpg': 'src/img.jpg',
        'dist/img.gif': 'src/img.gif'
      }
optimizationLevelは0-7で7が最高です。
元々はpngquantを使用しているようですね。
				options: {                       // Target options
					optimizationLevel: 7
				},
結果は下記のように返ってきます。
Running "imagemin:static" (imagemin) task
✔ src/tanaka.jpg (saved 2.23 kB)
Minified 1 image (saved 2.23 kB)

Done, without errors.
imageoptim+imageAlphaが最強?
grunt-contrib-imageminが検索すると出てくるのでつかっていたのですが、圧縮率が低いなーという印象がありました。
なので幾つか調べているとこれが結構良さそうです。
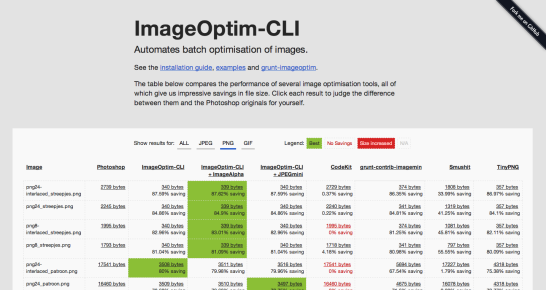
パフォーマンスを比較している面白いサイトがあったのでご紹介
作者による比較ページだと思いますが、allでかなり圧縮率が高いですね。
grunt-imageoptim
上記のImageOptim-CLIのgruntバージョンがありました。
こちらはImageOptimのアプリをダウンロードしておいて、gruntにtaskを記述しておくとgrunt実行した際に,
imageoptimのappが起動します
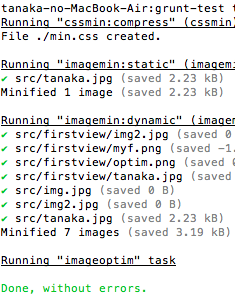
コマンドラインの実行結果はこんな感じ
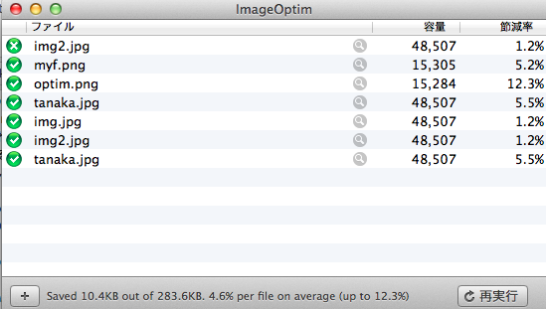
imageoptim.appが起動して、圧縮率が表示されます。
cliの方とは異なり、同時にimageAlphaとjpegminiを実行するわけではないので圧縮率はそこまでですが、
gruntでgrunt-imageminの最高値にしてもここまでは圧縮されないので、そこまで圧縮したくない画像に関しては、
imageminに設定して微調整、256色のものはimageoptimで結構削減しても問題ないです。
上記のコマンドラインのgrunt-imageminの結果と比較してもimageoptimの方が圧縮率が高い事がわかります。
grunt-livereloadでファイルの変更を監視
フォルダ分けしているのでconfigを2個書いています。
changedFiles = Object.create(null);
  onChangeImage = grunt.util._.debounce(function() {
    var filesArray, paths;
    paths = Object.keys(changedFiles);
    filesArray = [];
    paths.forEach(function(path) {
      filesArray.push({
        src: path,
        dest: path
      });
    });
    grunt.config(['imageoptim', 'feature', 'files'], filesArray);
    grunt.config(['imagemin', 'ondemand', 'files'], filesArray);
    changedFiles = Object.create(null);
  }, 200);

  grunt.event.on('watch', function(action, filepath) {
    changedFiles[filepath] = action;
    if (/\.(png|jpg)$/.test(filepath)) {
      onChangeImage();
    }
  });
https://github.com/JamieMason/grunt-imageoptim
後でgithubにソースコードを上げようと思っていますが、
imagemin, imageoptimを別々に設定。
livereloadでフォルダ、ファイルの更新・変更を監視して再実行という所までをやっています。
